
If you have an R.V. then you are probably well aware of how important it is to maintain the roof on your RV.
This DIY RV roof repair guide below will help you learn about some of the best tips for repairing and coating your RV's rubber roof so that it lasts as long as possible and saving you costly RV roof repairs in the future.
R.V.'s are also susceptible to R.O.I (Rusting, Oxidation and Improper Cleaning) which will speed up the process of needing rubber roof repairs or an Rv Roof Replacement for your RV.
If you are looking for the best liquid rubber roof coating that is known to last up to 20 years or longer, then Tough Tech Coatings has some of the best RV Rubber Roof Coating kits on the market today for diy rv roof repair.
This Guide will be a general guide for rubber roofs, fiberglass roofs, metal roofs, epdm roof, TPO roofs, aluminum roofs. You want to make sure you are using the correct roof material for your RV when recoating or repairing. Rv Owners typically are doing sealants around roof vents for seasonal rv roof maintenance. This Guide will hopefully help you discover how to keep your existing roof in top shape with little maintenance.
Inspect the RV Roof For Holes Crack Leaks and Rips
The first step in repairing and coating your RV roof is to inspect the R.V.'s roof for holes, cracks, leaks and rips.
If you find any of these items then you will need to do a little bit more than just repair it as they can cause damage to your RV roofs if not taken care of immediately!
A hole or crack in the R.V.'s roof can lead to water damage which will cause problems with your RV's insulation, windows, walls and ceilings!
Clean Surface Around Holes and Cracks If Needed
Next, if you have any holes or cracks that are in the R.V.'s roof then it is important to give them a good clean on and around them before determining how best to repair them!
Don't Apply Over Dirt
The Rv roof sealant and tape can sometimes be difficult to apply over dirt and grime so make sure that the area around these items has been properly cleaned beforehand.
Use a Degreaser Cleaner
You can find that a good degreaser cleaner will do the trick to clean effectively around any problem areas or the entire rv roof.
Patch The Hole or Crack With Tough Roof Tape and Rubber Roof Sealant
If you find any of these issues, then the easiest way would be to simply use some tough roof tape to patch up the hole or crack.
The best part about this is that it's super affordable and very easy for anyone to do on their own.
Make sure tape is covering up all parts of the repair.
Apply Tough Repair coating over the top of the tape repair job.
Make sure you are covering around the tape by at least 3 to 6 inches.
Allow Tough Repair Coating to dry for at least 4 hours before moving to the next step.
Power Wash The Entire Roof After all holes are sealed
Power Wash And Tape
Once the RV roof sealant Tape and sealant has been applied to holes or cracks it is important to give the entire R.V. roof a good scrub down with some power washing!This will ensure that no dirt or grime remains on your R.V.'s roof which can cause the new coating to not adhere properly.
(Note wait for entire RV roof to dry before applying TOUGH ROOF RV Sealant.)
Remove Loose RV Sealant Around Vents and Penetrations
Before applying coatings it's important to remove any loose sealant around the R.V.'s vents and penetrations!Remove Previous Sealants
If you don't do this then applying new Rv roof sealing can be difficult as there will already be a layer of R.V. coating in that area which can peel up underneath your new coatings so make sure your removing as much as you possibly can.Tools To Remove Sealant
Tools you could use for this include paint scrappers chisels grinders.Protect Rv Surface and rubber layer
However you want to make sure you do not damage any sublayer of your RV roof just shoot for removing the sealant and lose debris.Tape and Seal Around all vents, Lights, and Penetration's With RV Roof Tape
If you have already removed the loose R.V. sealant that's around vents and penetrations, then it's time to use some RV roof tape over these areas!
Apply Tough Roof Tape smoothly around all vents, skylights, penetrations to seal out all moisture from entering.
Make sure there is no bubbles in the tape and that the tape overlaps and covers all surface areas.
Tough Roof Tape is a rubber roof tape that adheres to your surface and is 100% waterproof.
The tape has a fabric mesh that coatings can be applied to to create a 100% waterproof membrane to your rv roof.
Next Step is you will want to coat the tough roof tape with tough repair coating.
Apply Tough Repair coating over the top of the tape repair job.
Make sure you are coating thick layer over the tape of approximately 1/8" thick. Be sure to cover the tape and the surface around the tape up to 3 to 6 inches to ensure complete waterproofing
Allow Tough Repair Coating to dry for at least 4 hours before moving to the next step.
Manufacture Sealant done with Silicone
When R.V.'s are manufactured they usually use silicone sealant which which adheres poorly and eventually lead to peeling and cracking causing damage or water to get in.
While it does help protect your R.V.'s roof and penetrations from the elements most RV repairs come from using this type of coating to seal your RV roof.
Weather you have an older R.V. or a new one then you might want to make sure its sealed properly with a strong RV's coating.
Choice The Right RV Sealant For Coating Entire RV Roofs
When RV roof repair is completed around the entire R.V.'s roof it's important to make sure you use a very strong RV sealant that can hold up under all types of weather conditions!
The R.V.'s roof can take a beating over time which is why it's important to use the best Rv sealant brand!
Top RV Sealant Brands To Consider When Repairing Your R.V. Roof
There are many different brands of RVs sealants on the market today however when your looking for one that will hold up to R.V.'s roof repair needs it's best to go with a more durable sealant which can stand up the weather!
Things to Avoid when choosing RV Roof Sealant
Silicone ( peels easily over time and cracks allowing water to penetrate.
Water Based ( Drys out over time causing cracking
Epdm Rolls. Without proper training on sealing seams this can cause water issues
silicone caulking 90% of most rv repair products are using this peels easily doesnt last long
What to look for in RV Roof Sealant:
High tensile strength (insures your roof will be able to handle the elements
Non water based. This insures the product will not dry up or deteriorate over time.
Rust inhibitors this protects R.V.'s roof from rusting and deteriorating
mold mildew resistant.
R.V.'s in high humidity areas which is why its important to have a product that prevents mold mildew growth
UV inhibitors prevent degradation from sunlight Look for a product with 80% UVIR Reflective
The best RV coating
will adhere well, be flexible and crack resistant even in extreme heat or cold temperatures. It should also be UV resistant which will prevent RV roof coating from fading over time.
Our Recommendation
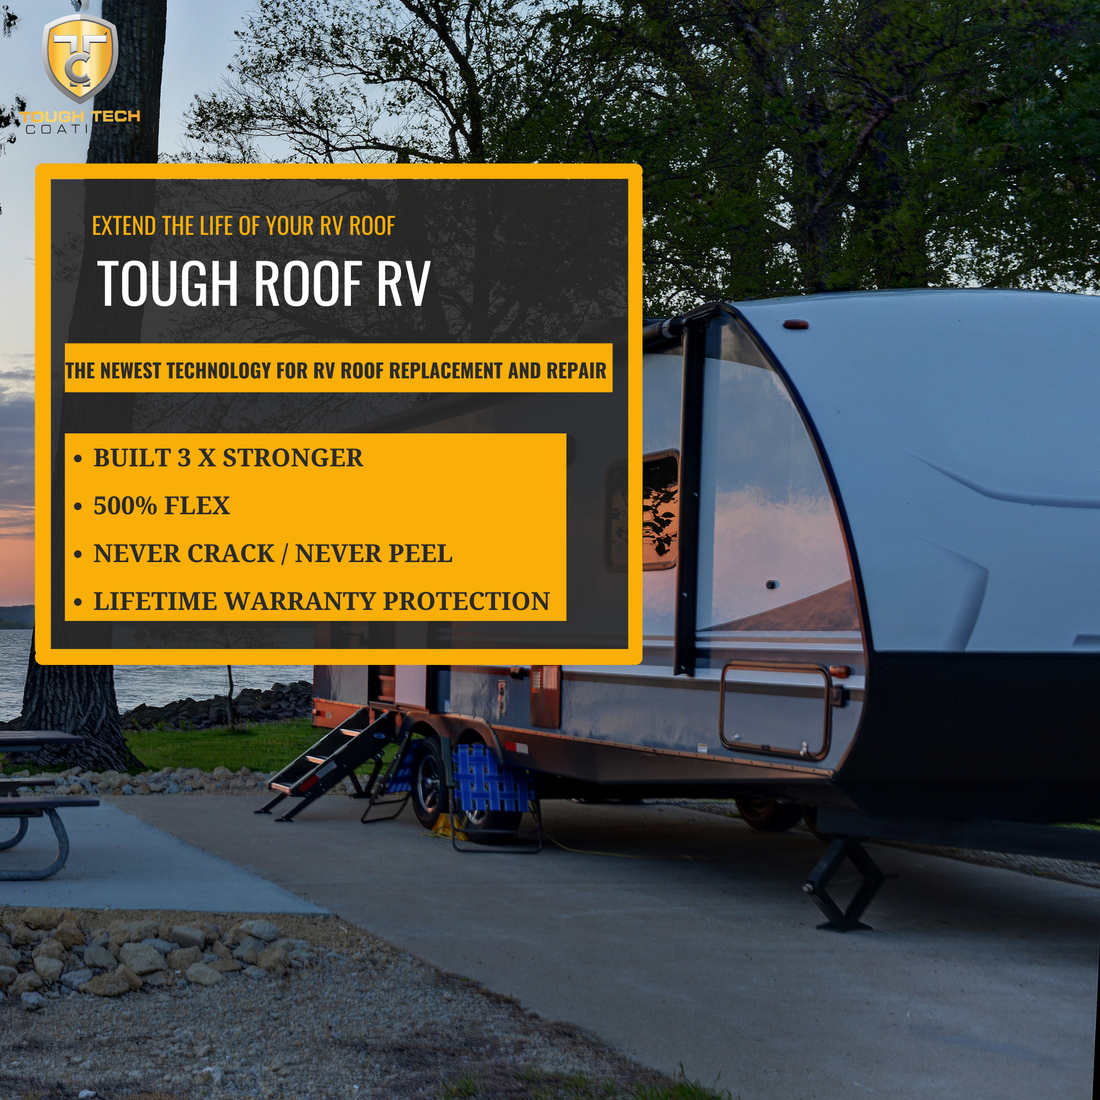
This is why we only recommend Tough Tech Coatings TOUGH ROOF RV.
First It is the only RV coating that has a lifetime guarantee from peeling and cracking.
Its has rust and mold inhibitors as well as is 86% reflective to sunlight.
The average sealant on RV have a tensile strength of 200 psi and flex at 100%.
TOUGH ROOF RV has a tensile strength of 1520 psi and can flex up to 500%
Tough Roof RV can be Applied To All RV and Trailers Surfaces.
Tape Off Around Edge of RV Roof with Painters Tape
Before sealing and coating R.V.'s with TOUGH ROOF RV is important to tape off around the perimeter of your R.V.'s roof so you don't get sealant on any other part!
This can be done with painters tape or duck brand 38806 RV safe masking tap.
Tape Around Parts of the RV that you want to prevent Roof Coating from getting on such as vents, Skylight Ladders Ect..
Time To Coat Your RV Roof With Rubber RV Roof Coating
You want to make sure that your applying your RV Rubber Roof coating in the appropriate temp to insure proper adhesion as well as making sure the surface is dry.
Applying Tough Roof RV is easy and doesn't require an special equipment or primers.
Simply use a paint roller or brush or sprayer if you have one. starting in one corner of your R.V.'s roof then slowly working across
You can pour out Tough Roof RV in foot long sections until you have gone over every inch of our RV Roof with a nice even layer of liquid rubber.
Typically 1 gallon will cover up to 80- 100 sq ft. Tough Roof RV is also self leveling.
TOUGH ROOF RV Coating will dry to the touch in 2 - 4 hours however give it at least 24 hours before driving your R.V. again!
Apply Second Coat
If you want an even stronger roof then apply a second coat after the first one dries for additional RV roof repair protection!
It's that simple to fix your RV, seal it up and protect it from future damage with our RV roof coating.
Final Thoughts
RV Roof Repair can be a costly endeavor, but it doesn't have to break the bank.RV roof repair isn't just for older rigs either. If your RV is new or old then you should consider sealing up any leaks with Tough Roof RV Coating before water damage makes it more expensive!
We recommend you checkout our TOUGH ROOF RV KITS and some of our tutorial videos that explain this more in depth.
At www.toughtechcoatings you can get a step by step process for diy roof repair in the comfort of your own driveway!Finally if these tips were helpful please like this blog post and share on social media as well as subscribe to our channel for future RV information!
Why TOUGH TECH
Tough Tech Coatings TOUGH ROOF RV - The Strongest RV Rubber Roof Coating On Earth
If your looking for the best RV Rubber Roof Coating or Sealant then you found it. Tough Tech has been tested in some of harshest conditions and has outperformed all other RV roof coatings in the industry!
Tough Roof RV is a permanent coating that can be used to Repair R.V.'s or entire roof coatings and comes with a lifetime guarantee.